For first-time users, getting started with Quarto ERP is quite simple. Let’s explore some common methods used in Quarto.
Start Up
You can download and install the software from the website URL provided below. For installation instructions, please refer to the PDF.
Getting started with Quarto ERP.
Once installed, the software creates a shortcut on the desktop. Double-click on the icon to open the software.
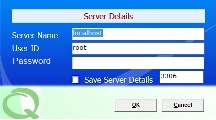
Server Details: The default options as given below would be used (if password was changed for root user then it should be provided). 3306 is the default port used by mysql. Do not select Save Server Details this time (to confirm the connection is successful). Click OK
Company Master
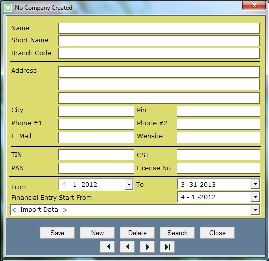 When we open the software for the first time, there won’t be any existing company.
So it will open the company master window. Provide Name and details of your company, and Click Save to create the new Company.
Financial Entry Start From: Date on which entry (Voucher Date) is allowed to Start.
Select Company
Once created, the company will appear in the company selection window. Click Select.
Show Financial Year: Used to view the existing financial years in the company so that we can login to any financial year present.
Login
 When a company is created, it also creates a user in the company.
Username: administrator
Password: administrator
You can change the user’s password by clicking on the Utilities–Reset Password option after logging in. Click OK to log in.
Main Window
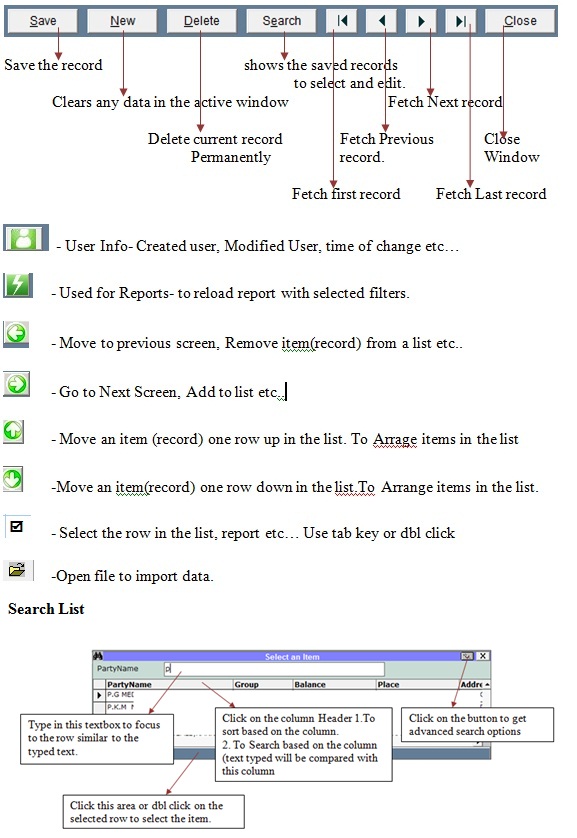
The image below explains the main window buttons and menus.
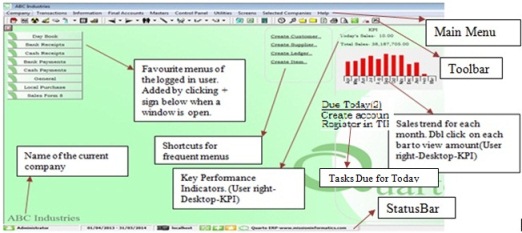
Menus and Buttons
 The main menu categorizes into 6 menus based on functionality. They are: Transactions – to create vouchers like receipts, payments, purchases, Sales, Orders etc..
Information – Reports
Final accounts – Final reports like Balance sheet, Profit & Loss, Current stock etc…
Masters – All master entries like Ledgers, Items, Location, area, unit etc…
Control Panel – Settings for the selected company- on pressing F6 from a selected window it will redirect to the corresponding setting
Utilities – Tools for backup, import etc…
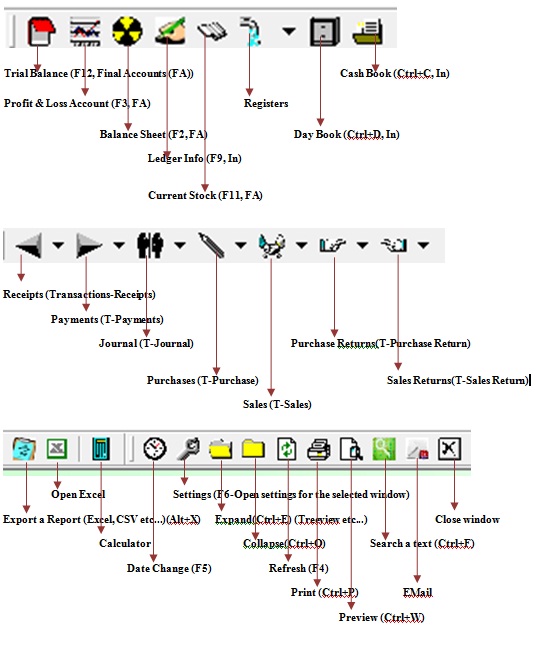
Toolbar Icons
Statusbar Icons
Common Controls and its functions
Important Keyboard Shortcuts
- Create ledger/Customer/Supplier [Ctrl+L]: Masters-Accounts-Ledger
- Create Account Group [Shift+F1]: Masters-Accounts-Account Groups
- Create item [Ctrl+M]: Masters-Inventory-Item
- Create Item Group [Shift+F2]: Masters Inventory-Group
- Bank Books [Ctrl+B]: Information-Bank Books
- Cash Books [Ctrl+K]: Information-Cash Books
- Ledger Info [F9]: Information-Ledger Info
- Day Book [Ctrl+D]: Information-Day Book
- Balance Sheet [F2]: Final Accounts-Balance Sheet
- Profit & Loss Account [F3]: Final Accounts-Profit & Loss Account
- Trial Balance [F12]: Final Accounts-Trial Balance
- Current Stock [F11]: Final Accounts-Stock Reports-Current Stock
- Receivables-Age wise [F8]: Information-Receivables-Receivables Age wise
- Payables-Age wise [Ctrl+F12]: Information- Payables- Payables Age wise
- Settings [F6]: Press F6 from any open window to get the corresponding settings
- Date Change [F5]: Press F5 from any open window to change the date period or date corresponding to the window
- Refresh [F4]: Press F4 from the active window to do refresh.
- Print [Ctrl+P]: Press Ctrl+P to print any active window
- Print Preview [Ctrl+W]: Shows Print Preview of active window
- Search [Ctrl+F]: Search a given text in the active window
- Export [Alt+X]: Export active window to any given format like excel, html etc…